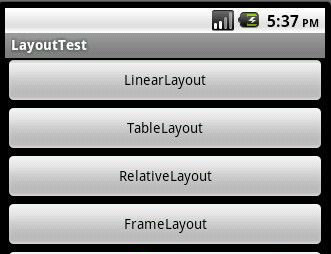
分享 Android 五种布局模式
Android布局是应用界面开发的重要一环,在Android中,共有五种布局方式,分别是:LinearLayout (线性布局),FrameLayout(框架布
局),AbsoluteLayout(绝对布局),RelativeLayout(相对布局),TableLayout(表格布局)。
在windows下有预览功能,可以在xml中查看布局的样式,在linux中无。
一、LinearLayout
线性布局,这个东西,从外框上可以理解为一个div,他首先是一个一个从上往下罗列在屏幕上。每一个LinearLayout里面又可分为垂直布局(android:orientation="vertical")和水平布局(android:orientation="horizontal" )。当垂直布局时,每一行就只有一个元素,多个元素依次垂直往下;水平布局时,只有一行,每一个元素依次向右排列。
linearLayout中有一个重要的属性 android:layout_weight="1",这个weight在垂直布局时,代表行距;水平的时候代表列宽;weight值越大就越大。
线形布局中预览和真机中完全一样。
TextView占一定的空间,没有赋值也有一定的宽高,要特别注意。
二、FrameLayout
FrameLayout是最简单的一个布局对象。它被定制为你屏幕上的一个空白备用区域,之后你可以在其中填充一个单一对象 — 比如,一张你要发布的图片。所有的子元素将会固定在屏幕的左上角;你不能为FrameLayout中的一个子元素指定一个位置。后一个子元素将会直接在前一个子元素之上进行覆盖填充,把它们部份或全部挡住(除非后一个子元素是透明的)。
三、AbsoluteLayout
AbsoluteLayout 这个布局方式很简单,主要属性就两个 layout_x 和 layout_y 分别定义 这个组件的绝对位置。 即,以屏幕左上角为(0,0)的坐标轴的x,y值,当向下或向右移动时,坐标值将变大。AbsoluteLayout 没有页边框,允许元素之间互相重叠(尽管不推荐)。我们通常不推荐使用 AbsoluteLayout ,除非你有正当理由要使用它,因为它使界面代码太过刚性,以至于在不同的设备上可能不能很好地工作。
四、RelativeLayout
相对布局可以理解为某一个元素为参照物,来定位的布局方式。
android:layout_方向 = id 表示 在这个id对应的控件的方向上(上|下)
android:layout_align方向 = id 表示和这个控件的(上下左右)对齐
android
: layout_to方向Of = id 表示在这个控件的 左或者右
eg:
android:layout_below="@id/la1"/>
将当前控件放置于id为la1 的控件下方。
android:layout_alignParentRight="true"
使当前控件的右端和父控件的右端对齐。这里属性值只能为true或false,默认false。
android:layout_marginLeft="10dip"
使当前控件左边空出相应的空间。
android:layout_toLeftOf="@id/true"
使当前控件置于id为true的控件的左边。
android:layout_alignTop="@id/ok"
使当前控件与id为ok的控件上端对齐。
五、TableLayout
表格布局类似Html里面的Table。每一个TableLayout里面有表格行TableRow,TableRow里面可以具体定义每一个元素。每个TableRow 都会定义一个 row (事实上,你可以定义其它的子对象,这在下面会解释到)。TableLayout 容器不会显示row 、cloumns 或cell 的边框线。每个 row 拥有0个或多个的cell ;每个cell 拥有一个View 对象。表格由列和行组成许多的单元格。表格允许单元格为空。单元格不能跨列,这与HTML 中的不一样。
TabRow只论行,不论列(列自定义)。
每一个布局都有自己适合的方式,另外,这五个布局元素可以相互嵌套应用,做出美观的界面。
例子:
1 线性布局(LinearLayout)
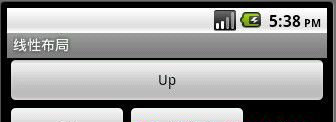
描述:最简单布局方式,依次向下进行排列。
<?xml version="1.0" encoding="utf-8"?>
<LinearLayout xmlns:android="http://schemas.android.com/apk/res/android"
android:orientation="vertical"
android
:layout_width="fill_parent"
android:layout_height="fill_parent">
<Button android:text="Up"
android:id="@+id/Button03"
android:layout_width="fill_parent"
android:layout_height="wrap_content"></Button>
<LinearLayout xmlns:android="http://schemas.android.com/apk/res/android"
android:orientation="horizontal"
android:layout_width="fill_parent"
android:layout_height="fill_parent">
<Button android:text="left"
android:id="@+id/Button01"
android:width="120px"
android:layout_width="wrap_content"
android:layout_height="wrap_content"></Button>
<Button
android:text="right"
android:id="@+id/Button02"
android:width="120px"
android
:layout_width="wrap_content"
android:layout_height="wrap_content"></Button>
</LinearLayout>
</LinearLayout>
2、 表格布局(TableLayout)

描述:类似于HTML table,在其中间添加View或是<TableRow></TableRow>控件。
<?xml version="1.0" encoding="utf-8"?>
<TableLayout
xmlns:android="http://schemas.android.com/apk/res/android"
android:id="@+id/TableLayout01"
android:layout_width="fill_parent" android:layout_height="fill_parent">
<TableRow android:gravity="center">
<Button
android:text="@+id/Button01"
android:id="@+id/Button01"
android:layout_width="wrap_content"
android:layout_height="wrap_content">
</Button>
</TableRow>
<TableRow android:gravity="center">
<TextView android:text="第一行第0列"
android:layout_width="wrap_content"
android
:layout_height="wrap_content"></TextView>
<TextView android:text="第一行第1列"
android:layout_width="wrap_content"
android:layout_height="wrap_content"></TextView>
</TableRow>
<TableRow android:gravity="center">
<TextView android:text="第二行第0列"
android:layout_width="wrap_content"
android:layout_height="wrap_content"></TextView>
<TextView android:text="第二行第1列"
android:layout_width="wrap_content"
android:layout_height="wrap_content"></TextView>
</TableRow>
</TableLayout>
3、 单帧布局(FrameLayout)
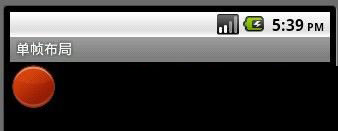
描述:类似于HTML层叠
<?xml version="1.0" encoding="utf-8"?>
<FrameLayout
xmlns:android="http://schemas.android.com/apk/res/android"
android:layout_width="wrap_content"
android:layout_height="wrap_content">
<ImageView
android
:id="@+id/ImageView01"
android:src="@drawable/circle_blue"
android:layout_width="wrap_content"
android:layout_height="wrap_content">
</ImageView>
<ImageView
android:id="@+id/ImageView02"
android:src="@drawable/circle_green"
android:layout_width="wrap_content"
android:layout_height="wrap_content">
</ImageView>
<ImageView
android:id="@+id/ImageView03"
android:src="@drawable/circle_red"
android:layout_width="wrap_content"
android:layout_height="wrap_content">
</ImageView>
</FrameLayout>
4、 相对布局(RelativeLayout)
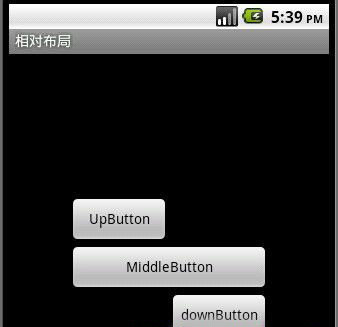
描述:取决于对参照控件进行布局,父控件和子控件均可
常用属性:android:layout_centerInParent=”true/false”
android:layout_above, android:layout_below
android:layout_alignleft, android
:layout_alignright.
<?xml version="1.0" encoding="utf-8"?>
<RelativeLayout xmlns:android="http://schemas.android.com/apk/res/android"
android:layout_width="fill_parent" android:layout_height="fill_parent">
<Button
android:id="@+id/btnmiddle"
android:text="MiddleButton"
android:layout_width="200px"
android:layout_height="wrap_content"
android:layout_centerInParent="true">
</Button>
<Button
android:id="@+id/btnup"
android:text="UpButton"
android:layout_width="100px"
android:layout_height="wrap_content"
android:layout_above="@id/btnmiddle"
android:layout_alignLeft="@id/btnmiddle">
</Button>
<Button
android:id="@+id/btndown"
android:text="downButton"
android
:layout_width="100px"
android:layout_height="wrap_content"
android:layout_below="@id/btnmiddle"
android:layout_alignRight="@id/btnmiddle">
</Button>
</RelativeLayout>
5、 坐标布局(AbsoluteLayout)
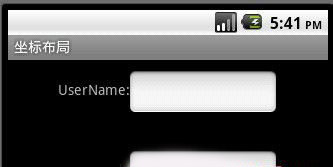
描述:对其控件进行直接定位,增加灵活性。
常用属性:android:layout_x,android:layout_y.
<?xml version="1.0" encoding="utf-8"?>
<AbsoluteLayout
xmlns:android="http://schemas.android.com/apk/res/android"
android:layout_width="wrap_content"
android:layout_height="wrap_content">
<TextView
android:layout_width="wrap_content"
android:text="UserName:"
android:layout_height="wrap_content"
android:id="@+id/tvName"
android:layout_y="20dip"
android:layout_x="50dip">
</TextView>
<TextView
android
:layout_width="wrap_content"
android:text="Password:"
android:layout_height="wrap_content"
android:id="@+id/tvPassword"
android:layout_y="100dip"
android:layout_x="55dip">
</TextView>
<EditText
android:layout_width="150px"
android:layout_height="wrap_content"
android:id="@+id/tvPassword"
android:layout_y="10dip"
android:layout_x="120dip">
</EditText>
<EditText
android:layout_width="150px"
android:layout_height="wrap_content"
android:id="@+id/tvPassword"
android:layout_y="90dip"
android:layout_x="120dip">
</EditText>
</AbsoluteLayout>
package com.jay.Layout;
import android.app.Activity;
import android.os.Bundle;
import android
.view.View;
import android.view.View.OnClickListener;
import android.widget.Button;
public class MyLayout extends Activity {
/** Called when the activity is first created. */
private Button btnLinearlayout;
private Button btnTablayout;
private Button btnRelativelayout;
private Button btnFramelayout;
private Button btnAbsolutelayout;
OnClickListener listener;
@Override
public void onCreate(Bundle savedInstanceState) {
super.onCreate(savedInstanceState);
setContentView(R.layout.main);
CreateControl();
listener = new OnClickListener() {
@Override
public void onClick(View v) {
// TODO Auto-generated method stub
switch (v.getId()) {
case R.id.btnlinearlayout:
setTitle("线性布局");
setContentView(R.layout.linearlayout);
break;
case R.id.btntableayout:
setTitle("表格布局");
setContentView(R.layout.tablelayout);
break;
case R.id.btnrelativelayout:
setTitle("相对布局");
setContentView(R.layout.relativelayout);
break;
case R.id.btnfreamelayout:
setTitle("单帧布局");
setContentView(R.layout.framelayout);
break;
case R.id.btnabsolutelayout:
setTitle("坐标布局");
setContentView(R.layout.absolutelayout);
break;
}
}
};
btnLinearlayout.setOnClickListener(listener);
btnTablayout.setOnClickListener(listener);
btnRelativelayout.setOnClickListener(listener);
btnFramelayout.setOnClickListener(listener);
btnAbsolutelayout.setOnClickListener(listener);
}
private void CreateControl() {
// TODO Auto-generated method stub
btnLinearlayout = (Button)findViewById(R.id.btnlinearlayout);
btnTablayout = (Button)findViewById(R.id.btntableayout);
btnRelativelayout = (Button)findViewById(R.id.btnrelativelayout);
btnFramelayout = (Button)findViewById(R.id.btnfreamelayout);
btnAbsolutelayout = (Button)findViewById(R.id.btnabsolutelayout);
}
}